Monday, June 28, 2010

Pillowcase Diaper Bag

I found this vintage hand embroidered pillowcase awhile back.  I wasn't quite sure what I was going to do with it but as soon as Fawnda announced the new ingredient for the iron crafter competition I new exactly what I wanted to do.  I made this gem!  I was thinking of it more as a purse but once I finished it I felt it looked more like a cute diaper bag. Now on with the tutorial.
I used the pillowcase shape to make a pattern for the base of the purse.
1. I cut 2 pieces of the pink fabric 20x 14 in. - Sew right sides together on all sides but leave the top open.  (the top is one of the long sides)
2.  I cut the pillowcase so I could use the embroidered side and the other side for the interior lining of the bag.  I cut the interior lining aprox.  20 in.  and  insert it in the base with wrong sides together.  I then stuck my hand in the purse to make a fold like so.

I folded it to the bottom and pinned in place.  Then I stitched into place.

 Then I stitched the the lining and outside of bag into place so that it would be easier to work with.

3.  Now lets work on the skirt of the bag.  I am using about 8 in. of the end of the pillowcase for this part. I took the trim off the end of the pillowcase because it was all torn up and added some different trim.
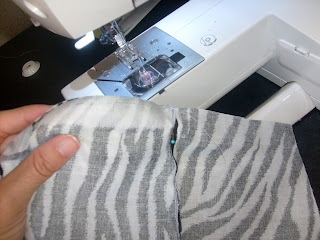
4.  Stitch skirt on the bag.  Then you can stitch a gathering stitch or just sew a large zig zag over fishing line for easy gathering.  Now it is ready for the opening and straps of the bag.
5.  For the opening I cut 4- 13x 5in. and had a 1"x 45" strip serged for the strap.
6.  cut the strap in half to make the two handles.
7.   lay the one piece face up and pin the straps into place and place another piece face down.

8.  Stitch the handle side with the right sides are togther.  You will do this for both handles
.
9.  Then open it up and sew the two pieces together at sides (right sides together). 
 
10.  Fold with right side out and turn under 1/4in.  on each side and gather bag, pin in place and stitch.


I entered this craft in the


Could you Help me reach 500 fans. Just like fancypantsbyjamee on facebook.   The 500th fan as well as the friend that suggested the 500th fan will get the pillowcase dress OF THEIR CHOICE and a matching bow EACH.  THANKS SO MUCH!!

Monday, June 21, 2010

Yummy Goodness Burritos

I tried a new recipe tonight and you must try it.  I got it from allrecipes.com.  It was one of the daily recipes. 

Breakfast Enchiladas but really I think of them more of burritos since they use flour tortillas
Ingredients


1 (16 ounce) package frozen hash brown potatoes

1 cup diced cooked ham

1 tablespoon vegetable oil

1 (4.5 ounce) can diced green chile peppers

1 1/2 cups shredded Cheddar cheese, divided

1 (28 ounce) can green chile enchilada sauce

8 (10 inch) flour tortillas

Directions

1.Preheat oven to 375 degrees F (190 degrees C).

2.Brown hash browns and ham in 1 tablespoon of oil in a medium skillet over medium high heat. Stir in diced green chilies and 1/2 cup of Cheddar cheese. Cook until cheese has melted.

3.Coat the bottom of a 9x13 inch baking dish with a small amount of enchilada sauce. Dip each tortilla in remaining sauce, and fill with potato-ham mixture. Roll each as tightly as possible and place in the baking dish, seam side down. Top with remaining sauce and cheese, and cover with tin foil.

4.Bake, covered, in the preheated oven for approximately 20 minutes. Remove foil and bake for another 10 minutes, or until lightly browned on top. Serve immediately.

I put some scrambled eggs in the mix.  This recipe reminds me of a delicious breakfast burrito I used to order at the Sunset Grill in the Sonoma Ranch Golf Course Clubhouse.  I hope you try it out.

Saturday, June 19, 2010

Bluebonnets Father's Day Present


Our family are fans of Cross Canadian Ragweed.  Cody Canada wrote a beautiful song called "Bluebonnets" for his son.  It is a favorite so I chose to make a father's day present based on that song.  Here is what I did:
I bought a wall decor picture at hobby Lobby at half price so I paid $10 for this.
It is pretty as is but I want it to say something else.  I was hoping I could just flip the mat over but the paper was glued to the mat. So I will just paint over it.

After I painted 2 coats, I added the letter stickers and pictures to get this gem.

I hope you will listen to this song, it is so sweet. The link I gave is from youtube and it was a soundcheck before a concert. If you have not heard this band you really are missing out. Have a great father's day weekend.

Tuesday, June 15, 2010

Tuesday To-Do

So many crafts , So little time!
First up on my to-do list this week is  the Dollar Tree Jewelry Organizer from Courtney over at Redheads Craft More Fun

She made these from some cork-boards she found at the Dollar Tree- GENIUS!!
Number 2 is solving several of my problems! It is a Ribbon organizer from Diane at In My Own Style.  If you remember, I tried my ribbon organizer on a gun rack which did not make my husband too happy.  This would be a great solution for that and also in reading this post it solved another problem I was thinking about.  I think I will use the S hook and chain in my booth at the farmer's market.  I can hang it from my tent and get more hanging space for my clothes!! So be sure to check out how she made this.

Number 3 Craft is just such a cute keepsake.  Kim over at A Girl and A Glue Gun made fingerprint pendants that turned out beautiful! Check it out and make some yourself.

Number 4 is from Ready-Set-Create.  She made these adorable necklace pendants.  I am thinking this would be a fun MOPS craft for next year.

Number 5  is from Pearls, Handcuffs, and Happy Hour.  She gave a mirror an excellent makeover.  The hard part now will be trying to find a beautiful mirror to work with !  I love how this came out.

Number 6 is from Junk Style.  I am quite envious of her Laundry Room that she remodeled.  She also used an old door for a coat rack that is just perfect in her new room.

Take the seventh day and rest from all your crafting.  Thanks for all ya'lls wonderful crafts.

Monday, June 14, 2010

Father's Day Texas Washer Set


Father's Day is fast approaching but I am ahead of the game when it came to my father's present.  I decided to make my dad some Texas Washers for when he will be playing in a washer tournament in Smackover, Arkansas this coming weekend.  Every year my family gets together during "Oil Town" weekend for a family reunion.  One of the activities they do is play washers. There are different variations of this game.  Some through the washers in a hole in the ground or a pvc in te ground, some have 1 hole, 3 hole, or 5 hole boards.  Some boards are flat and some are slanted.  We play on 5 hole slanted boards.  The ones we use are not carpeted and no back board.  Now on with the washers!!
To start I found a Texas Flag and printed it out.  Then I traced the washer out on the Texas.

I then cut it out and mod podged it on top of the washer.  I felt Dad needed a handy dandy case to put his washers in too.  I found this little box at hobby lobby.  I dry brushed it with red craft paint.

Finally I mod podged a Texas on the top.

Once this was dry, it was ready for the washers.  I went ahead and made an extra so my mom could make a necklace out of one. 

Sunday, June 13, 2010

Showcase Sunday


Sorry I have been absent from my blog these past couple of weeks.  I have been busy getting ready for the farmer's market.  I went last summer just about every Saturday.  I really enjoy the atmosphere out there.  There are so many talented crafters in our area.  At the Las Cruces farmer's market you will find jewelry, artists, photogrophers, seamstresses, farmers, rock hounds, leather and word craftsmen and women, stain glass artists, metal work, candle and soap makers, entertainers and of course kettle corn and other food vendors. In fact the human society even comes out to adopt out pets.  Our farmer's market is about 5 blocks of vendors. If you are ever in the area come out and support our local farmers and crafters. We are open Wed and Sat. form 8-12:30. 

I  still have plenty of work to do but will try to keep up with my crafts and posts about them. Now I would like to show off my newest addition to my Etsy shop.
I bought this fabric last year and I wanted to do something with it.  I had the top imagined in my head and it came out just the way I pictured the first time- soo happy with it.  You will definitely see me make more items in this design.  I have also wanted to make some puffy shorts but thought I would just put elastic in the legs but actually found a McCall's pattern for some.  I liked the pattern but it ran big so if you make it make it one size smaller.  I wanted to have a shirt for my son but was not happy with it so at this time I just offer the shorts.
I will be adding some new tutorials this week and plan on doing my Tuesday To-Do List so be sure to check back!! Have a great week.

Monday, June 7, 2010

Headband Holder Tutorial

I have returned to our local farmer's market.  I will have to share pictures soon so you can see all the wonderful crafters.  I sell children's clothes and accessories.  In setting up my booth I came across several display needs I need to work on.  I am planning on making some headbands to sell, so I need a way to display them.  Here is what I made.

I started with this:

I used an empty oatmeal tub for my base.  I measured the height of th carton.

It measured 9 1/4" so I marked that on the back of my self adhesive 12x12" scrapbook paper I found at Hobby Lobby. 

Then I cut off the excess. You will need two sheets to make it fit around the oatmeal carton.  I took the backing off the scrapbook paper and applied it carefully and slowly to prevent bubbles.

This is pretty basic but has lots of potential.  You could personalize it, decorate the top, use the carton to store bows inside- lots of possiblities.  I still need to work on these headbands and make a sign to come out the top of the lid for my price. 

Please don't forget to vote for your favorite recycled tin project over at fireflies and jellybeans  for the iron crafter.  I am #10 tin lid necklace.

Sunday, June 6, 2010

VOTE FOR ME!!


I entered this competition with this submission

I have made it to the top ten and now i need votes to win the competiton.  You just need to click on the iron crafter button to find the competion and the voting poll so you can vote for your favorite craft using recycled cans.  thanks!

Thursday, June 3, 2010

Guest Post: Crafting with Jamee at "Homemaker"- Raggy Washer Necklace Tutorial

Guest Post: Crafting with Jamee at "Homemaker"- Raggy Washer Necklace Tutorial
See how I made this by heading over to the link above!
Thanks to Sarah over at Harrigan Howdy for letting me guest post.


Read more: http://www.mylivesignature.com/mls_wizard2_1.php?sid=54488-93-65AE20D263D2C415B1D9C2C078173276#ixzz0gxmXqdUK