Tuesday, February 9, 2010
Whimsy Couture Giveaway
I don't know if you have seen these patterns but they are just beautiful!! Here patterns are everything BOUTIQUE. Right now she is having a giveaway for a 35 dollar gift certificate that ends feb 15th you can go to her blog to check it but i really hope I WIN ;) Below is her button or click here
Saturday, February 6, 2010
Valentine Refashion
I have been inspired by so many wonderful blogs to refashion clothes in a way I have never even thought about. It seems there are endless possiblities when it comes to fashion. Unfortunately, I have very little time to sew items I have rolling around in my head due to my etsy shop (which I do appreciate!!) I had a day a few weeks back when I had completed all my orders and wanted to attempt a valentine refashion for my daughter. I found a small petite black and white sweater I had bought to make a beanie and a scarf out of but I chose to make something else instead. I am very pleased with how it came out. Here is a rough little step by step play of the process, sorry i didn't take pictures along the way.
1. Take a pair of legging that fit your child nicely and fold in half to see its pattern. Lay on top of one of the sleeves and cut to the shape of the leg then do the other side.
2. Then with right sides together insert one leg into the other.
3. Stitch crotch then stitch again for durability.
4. make casing for elastic at the top and insert the elastic and stitch shut.
5. Now for the top. i took a patten that i liked and layed it on top of the sweater lining up the neckline.
6. cut the length, and sides with armholes
7. Then i added the applique from this fabulous fabric I found at joanns in the novelty section
8. With right sides together stitch up sides
9. Add ruffles at bottom
10. follow the tutorial from Dana found here to make puff sleeves (she has lots of great tutorials)
11. stitch the sides of the neck alittle to keep from falling off the shoulders
12. Look Fabulous!!
Sorry this really wasn't so much of a tutorial maybe i will remember to take photos through the process next time.
Wednesday, February 3, 2010
Embossed Feather Flower Tutorial
I have been thinking about this project and finally did it. If you have never embossed don't be intimidated by the term it is great for all sorts of crafts and is mostly seen in paper crafting. Here is a tutorial to make this embossed flower.
To start you need :
embossing powder you can find a great selection at stampamania.com
glue pen
embossing gun not to be mistaken for a blow dryer
flowers
glue gun found at hobby lobby stamamania.com
feathers (optional)
Okay lets begin before another child tells me they have to go potty- potty training!!
Now you will take your glue pin and draw where you want embossing powder to go. This glue dries fast so do a few petals at a time.
Then pour your embossing powder over the glue. I like to do this over a coffee filter so I can pour the unused embossing powder back in the container.
To start you need :
embossing powder you can find a great selection at stampamania.com
glue pen
embossing gun not to be mistaken for a blow dryer
flowers
glue gun found at hobby lobby stamamania.com
feathers (optional)
Okay lets begin before another child tells me they have to go potty- potty training!!
At this point you will pick which flowers you want to use and take them apart. I chose to use 3 different style yellow flowers. Then I restacked the flowers in the order I wanted them to go.
Then pour your embossing powder over the glue. I like to do this over a coffee filter so I can pour the unused embossing powder back in the container.
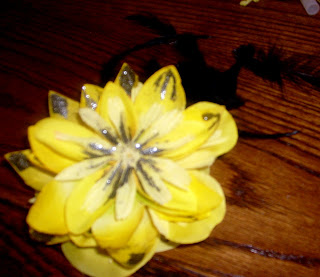
Then take your embossing gun which works very similar to a hair dryer, and melt the embossing powder. You should see a change in the powder where it gets glossy looking. I did this to several pieces but not all of them and came up with this:
After I finished I felt it needed more embellishing so of course I had to add feathers. Now it is time to head over to the wonderful glue gun!!
you will now glue your flower together
I added a rhinestone in the middle and a bee. I glued it on a lined alligator clip. For fine hair add a piece of that cushion shelf liner to keep from slipping out of the hair.
HOPE you like this little tutorial, I will be adding new tutorials to my blog so please follow me and link back to my blog. I love comments too!!
Saturday, October 31, 2009
Wyatt's New Bed

Well Wyatt has needed a new bed for awhile, he is a big dog so needs a big bed. I don't know if you have priced dog beds but they can be pretty pricey. Surely I can make it cheaper. I bought fleece at 50% off at Joanns and then looked at the foam-YIKES! 3in foam is priced at 39.99 a yard and I need 42 in. Even at half price it was way too expensive. My solution was Goodwill. I found a full/queen foam sheet there for 4 dollars. I cut it into rectangles and stacked it 3 sheets high. Next I stitched them together, cut my fleece with approx. 6 inches to spare all the way around my foam. I then cut out the corners and cut strips every inch. I tied all the strips and now my big german sheppard has a new bed for a total cost of 13.00.
Friday, February 6, 2009
Baby Name Plate

I made this for a friend of mine. Here are the details of it. I found the "perfect" frame at goodwill for 2 dollars (amazing - I know!!). Then I bought 1/4 of a yard of blue and white stripped flannel- I could of used scrapbooking paper but I didn't want a seam. The fabric cost 99 cents (flannel is a cheaper fabric). Then I bought a cute painted wooden frog from Hobby Lobby-59 cents. I used my cricut to cut the name in white foam. I have never cut foam with the cricut before. It was a bit tricky and next time I will multi -cut it. Then I cut the shadow of the name in brown. I used some ribbon I had on hand to bring it all together and hot glued it down. I think the end product turned out super cute. Total cost about 4.50
Monday, December 1, 2008
Aprons
Bow Board

I made this for my four year old niece for Christmas this year. With a tight budget, we tried to make as many gifts as possible for about 5 dollars. I bought a frame at a garage sale for a dollar and painted it with craft paint on hand. Then I bought some foam to put in the frame. I bought two and cut to fit. then I covered the foam with purple fabric (approx. 1/4 yard)- hot gluing it into place. Next I hot glued ribbon stripes on to hold bows. Last I embellish the frame with a painted butterfly I found at hobby lobby for a dollar. I sweetened the present with some bows I made with ribbon I already had. The bow board was made to match the little girls room.
Subscribe to:
Posts (Atom)


